Battery switch on travel trailer function is crucial for managing your RV’s power. Understanding how these switches work – whether rotary, rocker, or electronic – is key to maximizing your battery life and preventing electrical issues. This guide breaks down the different types, wiring diagrams, troubleshooting tips, and safety precautions to keep your travel trailer running smoothly. We’ll also cover integrating your battery switch with solar panels and inverters for a more efficient and sustainable power setup.
From simple single-switch systems to more complex setups managing multiple batteries, we’ll cover everything you need to know to confidently handle your travel trailer’s electrical system. We’ll explore common problems, their solutions, and best practices to ensure you’re prepared for any situation on the road.
Understanding Battery Switch Functionality in Travel Trailers

A battery switch is a crucial component in a travel trailer’s electrical system, allowing you to manage power flow from your house batteries to various appliances and systems. Understanding how it works is key to preventing electrical issues and ensuring a smooth camping experience. This section will detail the different types of switches, their wiring, and proper connection procedures.
Types of Battery Switches Used in Travel Trailers
Travel trailers typically utilize one of two main types of battery switches: a simple on/off switch or a more sophisticated multi-position switch, often a 1-2-3 switch. The simple on/off switch provides a basic connection or disconnection of the battery. The 1-2-3 switch offers more control, allowing you to isolate the batteries, connect to the house batteries only, or connect to both the house and the vehicle’s starting battery (if applicable).
Choosing the right type depends on your trailer’s electrical system complexity and your power management needs.
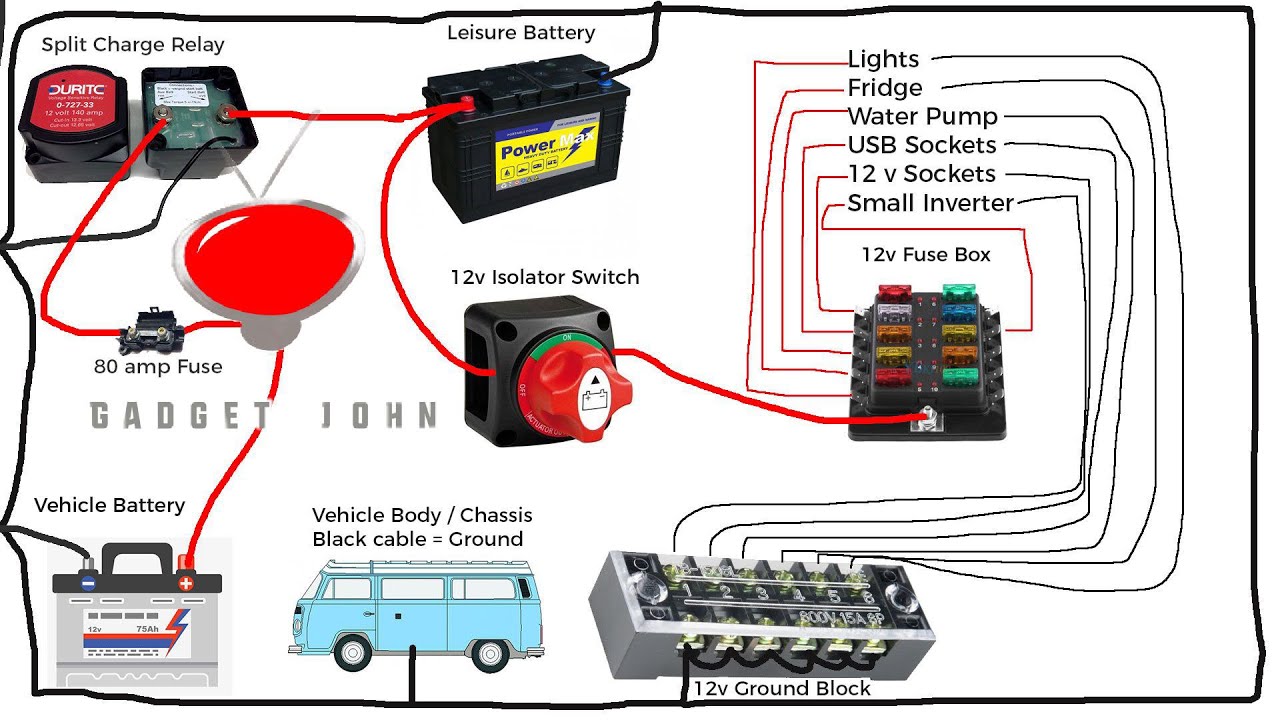
Wiring Diagrams for a 1-2-3 Battery Switch System
A typical 1-2-3 battery switch system involves two batteries (house and vehicle’s starting battery) and the switch itself. The switch has three positions:
1. OFF
This position disconnects both batteries from the trailer’s electrical system, preventing any drain.
2. BATTERY 1 (House)
So, you’re an audiophile who travels? Awesome! Check out this guide on creating the perfect audiophile travel setup for amazing sound on the go. It covers everything from portable DACs to noise-cancelling headphones. But if you’re looking for something more budget-friendly, consider this alternative resource on building a killer audiophile travel setup – it focuses on maximizing sound quality without breaking the bank.
Remember, good sound doesn’t have to be expensive!
This connects only the house battery to the trailer’s systems.
3. BATTERY 1 & 2 (House and Vehicle)
This position connects both the house battery and the vehicle’s starting battery to the trailer’s system. This is useful for boosting the house batteries if needed.A simplified diagram would show the house battery connected to one terminal on the switch, the vehicle battery to another, and the trailer’s electrical system connected to a third. Each position on the switch routes power accordingly.
The exact wiring configuration may vary slightly depending on the specific switch and trailer setup, but the core functionality remains the same. Always consult the wiring diagram provided with your specific battery switch.
So, you’re an audiophile who travels? Awesome! Check out this guide on creating the perfect audiophile travel setup for amazing sound on the go. It covers everything from portable DACs to noise-canceling headphones. But if you’re looking for more budget-friendly options, then you might want to explore this other resource on audiophile travel setups that focuses on maximizing sound quality without breaking the bank.
Remember, great sound doesn’t have to be expensive!
Connecting a Battery Switch to a Travel Trailer’s Electrical System
Connecting a battery switch requires working with electrical systems; if you’re uncomfortable, consult a qualified electrician. The following steps provide a general guideline:
1. Disconnect the batteries
Before beginning any work, disconnect both the house and vehicle batteries to prevent accidental shocks or short circuits.
2. Mount the switch
Securely mount the battery switch in a convenient and accessible location within your trailer.
3. Wire the batteries
Connect the positive (+) cables from each battery to the appropriate terminals on the switch. Clearly label each wire.
4. Wire the trailer’s system
Connect the positive (+) cable from the trailer’s electrical system to the output terminal on the switch.
5. Connect the negative (-) cables
Connect the negative (-) cables from each battery directly to the trailer’s chassis or a common ground point. Do not run the negative cables through the switch.
6. Reconnect the batteries
Reconnect the batteries.
7. Test the system
Carefully test the switch in each position to ensure correct functionality.Remember to use appropriately sized wiring and fuses for the amperage of your system. Incorrect wiring can lead to damage or fire.
Power Flow Through a Typical Battery Switch Setup
The following flowchart illustrates the power flow:[Diagram Description: The flowchart begins with two battery sources (House Battery and Vehicle Battery). Each battery has a positive (+) and negative (-) terminal. Arrows indicate the flow of electricity. The positive cables from both batteries connect to the 1-2-3 switch. The switch has three positions: OFF, BATTERY 1, and BATTERY 1 & 2.
Each position has an output terminal indicated with an arrow pointing towards the “Trailer Electrical System”. The negative cables from both batteries are directly connected to the “Trailer Chassis Ground”. The flowchart shows that in the OFF position, no power flows to the trailer. In the BATTERY 1 position, only the House Battery supplies power to the trailer.
In the BATTERY 1 & 2 position, both the House Battery and the Vehicle Battery supply power to the trailer. ]
Battery Switch Types and Their Applications
Choosing the right battery switch for your travel trailer is crucial for efficient power management and preventing electrical issues. Different switch types offer varying levels of control and complexity, each suited to different needs and setups. Understanding these differences will help you select the best option for your specific travel trailer.
Rotary Battery Switches
Rotary switches are a classic and reliable choice. They typically offer multiple positions, allowing you to select between battery banks (e.g., house battery, chassis battery, or both combined), or to disconnect both entirely. These switches are generally robust and easy to understand, making them a popular option for many RVers. A common disadvantage is that they can sometimes be a bit harder to switch than a rocker switch, especially if you have arthritis or other dexterity issues.
They’re a good fit for smaller travel trailers with simpler power needs. For instance, a small camper with just one house battery and a single chassis battery would benefit from the straightforward operation of a rotary switch.
Rocker Battery Switches, Battery switch on travel trailer function
Rocker switches offer a simpler, more intuitive on/off control for each battery bank. While not always providing the combined battery option of a rotary switch, they are generally easier to operate and often visually clearer in their indication of which battery is connected. These are ideal for those who prefer a simple, easy-to-use interface, even if it means potentially sacrificing some flexibility in power management.
A travel trailer with separate circuits for appliances and lights, each connected to a different battery bank, could benefit from separate rocker switches for easy individual control.
Electronic Battery Switches
Electronic switches offer the most advanced control, often incorporating features like remote monitoring, automatic charging prioritization, and even low-voltage disconnect protection. These switches typically provide more sophisticated power management capabilities, but at a higher initial cost and with a potential for greater complexity in troubleshooting. They’re well-suited for larger, more complex setups with multiple battery banks and sensitive electronics.
A large fifth-wheel with multiple batteries, solar panels, and a generator would benefit from the precise control and monitoring provided by an electronic switch. A potential downside is the increased reliance on electronics; a failure could leave you without battery power.
Single vs. Multiple Battery Switches
The decision between using a single or multiple battery switches depends heavily on your travel trailer’s size and electrical system complexity. A single switch is sufficient for smaller trailers with a simple setup, providing basic control over battery selection. However, for larger trailers with multiple battery banks (e.g., a dedicated deep-cycle house battery bank and a starting battery), multiple switches offer more granular control, allowing you to manage power more effectively.
Using multiple switches allows for isolating specific battery banks for maintenance or preventing drain on one bank while utilizing another. For example, you could isolate the house battery bank while driving to prevent accidental discharge.
Appropriate Battery Switch Selection
The appropriate battery switch type and number will depend on your travel trailer’s power requirements. Smaller trailers with basic electrical systems might only need a single, simple rotary or rocker switch. Larger trailers with multiple batteries, solar panels, and complex electrical demands might benefit from an electronic switch or a combination of multiple rocker switches. Always consult your trailer’s electrical schematics and consider the size and number of your batteries when making your selection.
Improving Power Management with Different Switch Configurations
Different switch configurations can significantly improve power management. For example, using separate switches for house and chassis batteries allows you to isolate the house battery while driving to prevent accidental discharge. This prolongs the life of your house battery and ensures you have power for essential appliances while camping. A system with multiple switches and an electronic monitoring system can provide real-time information on battery levels, enabling more efficient use of power resources.
Similarly, configuring switches to prioritize charging certain batteries first can extend their lifespan and improve overall system performance.
Troubleshooting Common Battery Switch Issues
Battery switches, while simple in design, are crucial for managing power in your travel trailer. Problems with your battery switch can leave you stranded without power, so understanding how to troubleshoot them is essential. This section will cover common problems, provide a troubleshooting guide, and show you how to test your switch with a multimeter.
Common Battery Switch Problems
Several issues can arise with your battery switch, often stemming from the harsh environment they operate in. Corrosion is a frequent culprit, slowly degrading connections and reducing conductivity. Loose connections, either at the switch itself or the battery terminals, can also lead to intermittent or complete power loss. Finally, the switch itself can fail, becoming internally damaged and unable to properly connect or disconnect circuits.
Troubleshooting Guide for Battery Switch Malfunctions
A systematic approach to troubleshooting is key. Start by visually inspecting the switch and connections for obvious problems like corrosion or loose wires. Then, use a multimeter to test the switch’s functionality, ensuring proper continuity when it should be “on” and no continuity when “off.” If the problem persists, consider replacing the switch entirely.
Battery Switch Troubleshooting Table
| Symptom | Possible Cause | Solution |
|---|---|---|
| No power to appliances when the switch is on. | Corrosion on switch terminals or battery terminals. | Clean terminals with a wire brush and baking soda solution. Apply dielectric grease after cleaning. |
| Intermittent power to appliances. | Loose connections at the switch or battery terminals. | Tighten all connections securely. |
| Switch feels stiff or difficult to operate. | Internal switch failure or corrosion within the switch mechanism. | Replace the battery switch. |
| No power to house batteries even with the switch in the appropriate position. | Blown fuse or faulty circuit breaker in the battery system. | Check and replace any blown fuses or reset tripped circuit breakers. |
Testing a Battery Switch with a Multimeter
To test your battery switch, you’ll need a multimeter set to the continuity test mode (usually represented by a diode symbol). First, ensure the switch is in the “off” position. Place one multimeter probe on each terminal of the switch. You should get no continuity (no beeping sound or reading near zero ohms). Next, switch the battery switch to the “on” position.
Now, test the continuity again. You should get a reading indicating continuity (a beep or a low resistance reading). If you don’t get these results, the switch is likely faulty and needs replacement. Remember to always disconnect the negative battery terminal before performing any electrical tests.
Safety Precautions and Best Practices: Battery Switch On Travel Trailer Function
Working with batteries and electrical systems in your travel trailer requires caution. Improper handling can lead to serious injury or damage to your equipment. This section Artikels essential safety procedures and best practices to ensure a safe and efficient experience. Remember, always prioritize safety when working with electricity.
Maintaining and Cleaning Battery Switch Connections
Regular maintenance of your battery switch connections is crucial for optimal performance and safety. Corrosion can build up over time, leading to poor conductivity and potentially dangerous overheating. To maintain clean connections, start by disconnecting the battery switch completely before any cleaning or maintenance. Use a wire brush or sandpaper to clean the terminals, removing any corrosion or debris.
Apply a corrosion inhibitor to the terminals after cleaning to prevent future buildup. Tighten all connections securely using the appropriate wrench, ensuring a firm and reliable contact. Visually inspect the wiring for any signs of damage, such as fraying or melting. Replace any damaged wiring immediately.
Safety Procedures When Working with Batteries and Electrical Systems
Working with batteries and electrical systems involves inherent risks. Always wear appropriate safety gear, including safety glasses and gloves. Before working on any electrical component, ensure the power is completely disconnected by turning off the battery switch and checking that there is no power at the terminals using a voltmeter. Be aware of the potential for sparks and avoid working near flammable materials.
Never work on electrical systems when wet or in a damp environment. If you are unsure about any aspect of the work, consult a qualified electrician. Always remember that lead-acid batteries produce hydrogen gas, which is highly flammable. Ensure adequate ventilation when working with these batteries.
Properly Disconnecting and Reconnecting the Battery Switch
Disconnecting and reconnecting the battery switch should always be done methodically to avoid accidental shorts or sparks. First, turn off any appliances or electronics connected to the battery system. Next, disconnect the negative (-) terminal from the battery first. Then, disconnect the positive (+) terminal. When reconnecting, reverse the process, connecting the positive (+) terminal first, followed by the negative (-) terminal.
This prevents accidental shorts that could cause sparks or damage to the electrical system. When working on the switch itself, make sure the power is completely disconnected before removing any components or performing any adjustments.
Using Appropriately Sized Wiring and Fuses with Battery Switches
Using appropriately sized wiring and fuses is critical for safety and proper functionality of the battery switch. Undersized wiring can overheat and pose a fire hazard, while oversized fuses can fail to protect the circuit from overloads. Consult the manufacturer’s specifications for your battery switch to determine the appropriate wire gauge and fuse rating. Never use a fuse with a higher amperage rating than specified.
Using the correct size wire and fuse ensures the system operates safely and efficiently within its design limits. Improper sizing can lead to circuit damage, equipment failure, and even fires.
Battery Switch and Solar Panel Integration
Integrating a solar panel system with your travel trailer’s battery switch offers a convenient way to manage power from both your house batteries and solar panels. Understanding how these systems interact is crucial for efficient power management and preventing potential problems. This section details the interaction, connection process, and potential issues.
A battery switch acts as a central control point, allowing you to isolate or connect your house batteries to different power sources (shore power, generator, or solar). Your solar panel system, consisting of solar panels, a charge controller, and your house batteries, works independently, but the battery switch determines how the charged batteries are used. The charge controller regulates the voltage and current from the solar panels to safely charge your batteries.
The battery switch doesn’t directly control the charging process; instead, it controls the flow of power
-from* the charged batteries to the appliances in your trailer.
Solar Panel System Integration Diagram
The following diagram illustrates how a battery switch integrates with a solar panel charging system. It shows the flow of power from the solar panels, through the charge controller, to the batteries, and then how the battery switch controls the distribution of power to the trailer’s electrical system.

Connecting a Solar Panel System to a Battery Switch
Connecting a solar panel system to a battery switch requires careful wiring and adherence to safety precautions. Improper connections can lead to damage to your equipment or even create a fire hazard. Always consult the manuals for your specific components. The process generally involves these steps:
- Disconnect all power sources: Before starting any wiring, disconnect your travel trailer from shore power and ensure your generator is off.
- Connect the solar panels to the charge controller: Follow the manufacturer’s instructions for wiring the solar panels to your charge controller. This usually involves connecting positive (+) and negative (-) wires.
- Connect the charge controller to the batteries: Connect the output wires from the charge controller to your house batteries. Again, carefully match positive (+) and negative (-) terminals. Ensure proper sizing of wires to handle the current.
- Connect the batteries to the battery switch: Connect the battery switch to your house batteries. The wiring method depends on your battery switch type (e.g., 2-battery, 3-battery, etc.).
- Connect the battery switch to the trailer’s electrical system: Connect the output side of the battery switch to your travel trailer’s electrical system. This will provide power to your appliances when the switch is in the “on” position.
- Test the system: After making all connections, carefully test the system to ensure everything is working correctly. Monitor battery voltage and current draw.
Potential Issues and Solutions
While integrating a solar panel system with a battery switch is generally straightforward, some issues can arise. Understanding these potential problems and their solutions is crucial for a smooth and safe operation.
| Issue | Solution |
|---|---|
| Overcharging of batteries | Check charge controller settings and ensure it’s correctly sized for your battery bank and solar panel array. A faulty charge controller may need replacement. |
| Incorrect wiring leading to blown fuses or damaged components | Double-check all wiring connections, ensuring positive (+) and negative (-) wires are correctly connected and appropriately sized for the current. Replace any blown fuses with the correct amperage. |
| Battery switch malfunction | Check the switch’s operation. If faulty, replace the switch. A faulty switch can prevent power from reaching the appliances or even damage the batteries. |
| Insufficient solar power generation | Check the solar panels for shading, dirt, or damage. Ensure the panels are correctly oriented towards the sun. If necessary, increase the size of your solar panel array. |
Battery Switch and Inverter Interaction
A battery switch acts as a crucial gatekeeper in your RV’s electrical system, controlling power flow from your battery bank to various components, including your inverter. Understanding how the switch interacts with the inverter is vital for efficient and safe power management. Improper interaction can lead to system failures or even damage to your equipment.The battery switch dictates which battery bank (or banks) supply power to the inverter.
If your switch is in the “off” position, or directing power to a different circuit, the inverter will not receive power and won’t function. In the “on” position, the switch connects the selected battery bank to the inverter’s input, allowing the inverter to convert DC power from the batteries into AC power for your household appliances. Different switch types (e.g., single, dual, or multi-bank switches) offer varying degrees of control over this power flow.
Inverter Sizing Considerations Based on Battery Switch and Bank Capacity
Choosing the right inverter size is crucial for preventing damage to your inverter and battery bank. An inverter that’s too small for your power needs will overload and potentially fail. Conversely, an oversized inverter might draw excessive current, potentially damaging your batteries or switch. The maximum continuous power output of your inverter should not exceed the capacity of the battery bank connected through the switch.
For example, if your battery bank can safely supply 100 amps at 12 volts, you shouldn’t use an inverter that requires more than 1200 watts (Watts = Volts x Amps). Always consult the specifications of both your inverter and battery switch to ensure compatibility and safe operation. Consider surge capacity too; an inverter’s surge rating (the peak power it can deliver briefly) should be considered when running high-startup-current devices like refrigerators.
Impact of Battery Switch on Inverter System Efficiency
A well-functioning battery switch has minimal impact on inverter efficiency. However, a poorly maintained switch, with corroded connections or loose wiring, can introduce voltage drops, reducing the overall efficiency of the system. These voltage drops can cause the inverter to work harder, drawing more current from the batteries and potentially overheating. Regular inspection and maintenance of your battery switch connections are therefore essential for optimal inverter performance.
Similarly, a switch with poor contact can increase resistance, leading to power loss as heat. This heat generation not only decreases efficiency but also poses a fire hazard.
Common Inverter Problems Related to Battery Switch Operation
It’s important to regularly check the battery switch for proper operation to prevent inverter issues. Here are some common problems:
- Inverter not powering on: Check if the battery switch is correctly set to supply power to the inverter’s circuit. Inspect for loose or corroded connections at the switch and the inverter input.
- Inverter tripping its breaker or shutting down: This may indicate an overload, but it could also be due to a voltage drop caused by a faulty battery switch or its connections. A low battery voltage detected by the inverter can also trigger this response.
- Inverter producing low output voltage: A poorly functioning battery switch leading to voltage drop can cause the inverter to produce less than its rated output voltage. This will result in appliances running poorly or not at all.
- Inverter beeping or displaying error codes: Some inverters have diagnostic features. Consult the inverter’s manual to understand the meaning of any error codes and whether a battery switch issue is indicated.
Mastering your travel trailer’s battery switch is a vital step in becoming a confident RV owner. By understanding the different types of switches, their functions, and potential issues, you can confidently manage your power, extend battery life, and avoid costly repairs. Remember to always prioritize safety when working with electrical systems and refer to your RV’s manual for specific instructions.
Happy travels!
Commonly Asked Questions
What size fuse should I use with my battery switch?
The appropriate fuse size depends on the amperage rating of your battery switch and wiring. Consult your RV’s manual or a qualified electrician for the correct size.
How often should I clean my battery switch connections?
Inspect and clean your battery switch connections at least once a year, or more often if you notice corrosion or other issues. Use a wire brush and baking soda solution to remove corrosion.
My battery switch is making clicking noises. What’s wrong?
Clicking noises often indicate a loose connection or a faulty switch. Check all connections and consider replacing the switch if necessary.
Can I use a battery switch with lithium batteries?
Yes, but you might need a specific type of battery switch designed for lithium batteries, as they have different voltage and charging characteristics. Consult a professional for guidance.
